With the philosophy of using modern technology as a foundation for breakthroughs in quality, SHINKO applies high-grade raw materials combined with a strict production process to create roof tiles that meet the highest standards of durability and aesthetics. Notably, two key raw materials are the PVA fibers (polyvinyl alcohol) supplied by Kuraray Group and the industrial coatings supplied by DAI NIPPON TORYO.
SHINKO Color Tiles not only meet ISO 9001:2015 standards but also comply with Japanese Industrial Standard JIS A 5402:2002, ensuring eco-friendliness and user safety. This product has quickly established SHINKO’s reputation and position in Vietnam’s construction material industry.
The product is shaped by high-pressure hydraulic pressing, which ensures density and high mechanical strength. Additionally, SHINKO Color Tiles are reinforced with PVA KURALON™ fibers, forming a network structure with excellent impact resistance and eliminating shrinkage or warping during use.
30% LIGHTER WEIGHT
Thanks to the application of PVA fiber reinforcement technology, SHINKO tiles are up to 30% lighter than traditional concrete tiles. This advantage helps reduce the load on the roof truss system, optimize structural costs, and simultaneously significantly save on transportation and installation expenses.
HEAT INSULATION & UV RESISTANCE
High-performance coating systems have the ability to reflect ultraviolet (UV) rays and thermal radiation from sunlight. This feature helps reduce the amount of heat transferred into the building, contributing to a cooler indoor environment and energy savings for cooling systems.
WATERPROOFING
The solid tile body produced by high-pressure hydraulic technology acts as the first defense. The premium Acrylic coating provides full waterproofing, preventing rainwater infiltration and protecting the roof structure.
EASY AND QUICK INSTALLATION
Manufactured with advanced hydraulic pressing technology, every tile achieves perfect precision and consistency in size. Together with its lightweight structure, this allows for quick and effortless transportation and installation, helping to accelerate project progress and cut down on labor expenses.
COLOR RETENTION UP TO 20 YEARS
The tile surface is protected by premium Acrylic coating from Dai Nippon Toryo (Japan). SHINKO uses thermosetting coating technology with 4 different paint layers to enhance adhesion, maximize color fastness, and withstand harsh weather conditions.
ANTI-MOSS
The tile surfaace is covered with a special coating from Dai Nippon Toryo (Japan) that features superior anti-mold ability. This coating limits the accumulation of dirt and moisture - the environment where moss and algae thrive - helping the roof consistently maintain its clean and beautiful appearance.
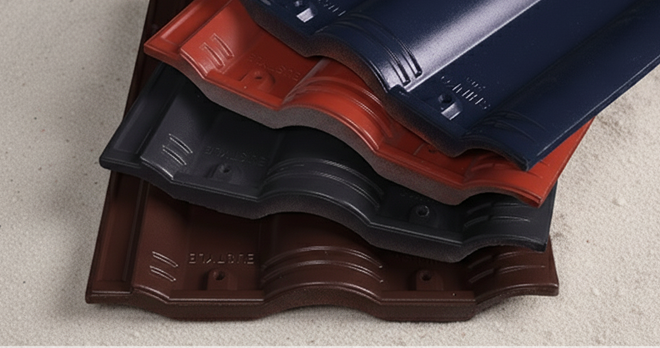
DIVERSE COLORS - MODERN DESIGN
SHINKO provides a versatile product portfolio featuring two main tile types - Wave Tiles and Flat Tiles - complemented by a wide range of elegant colors. This diversity empowers architects and project owners to unleash creativity and bring any design concept to life.
MANUFACTURING PROCESS
01
MIXING
The fully automatic dosing and mixing system ensures a homogeneous concrete mortar mixture that meets the exact technical standards for each product batch.
02
HYDRAULIC PRESSING
Each tile is shaped using a hydraulic press with an extremely high pressure (100-125 tons), producing a dense product with high mechanical strength and precise dimensions.
03
PROTECTIVE CURING
Raw tiles are placed in the curing chamber to promote the hydration process of the concrete, helping the product quickly reach the standard strength before proceeding to the coating stage.
04
COATING
The products pass through an automatic coating line with three main painting stages: primer, base coat, and color topcoat. The topcoat is specially applied in four continuous spray layers, guaranteeing consisten thickness, full coverage, and a flawless surface finish.
05
QUALITY CHECK & PACKAGING
Each tile undergoes a final quality inspection for color and dimensions. Only products that meet the standards are packed, labeled, and stored as finished goods, ready for delivery to customers.
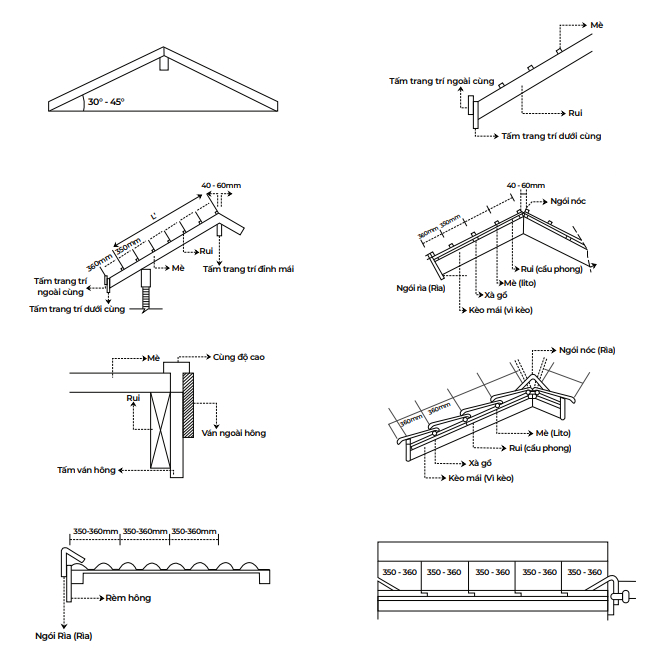
Installing SHINKO wave tiles requires preparing the roof structure with the proper slope and standardized batten spacing. Tiles should be laid from the bottom up, moving left to right, and each tile fixed to the battens with dedicated screws. Finish the roof with verge tiles, ridge tiles, and under ridge tiles following the recommended procedure to achieve a strong, long-lasting, and beautifully finished roof.
STEP 1: ROOF STRUCTURE PREPARATION
– Roof Slope Inspection: Ensure that the roof slope meets the standard for proper drainage, ideally from 25 degrees or more.
– Batten System Installation: Battens should be evenly spaced – usually between 29 and 33cm and aligned parallel to one another.
– Preparation of Roof Tile Accessories: Includes verge tiles, ridge tiles, under ridge tiles, and screws for installation.
STEP 2: MAIN TILE INSTALLATION
– Start from the bottom row: Lay each row of tiles from the bottom up to the roof ridge, ensuring even alignment.
– Installation order:
+ For small wave tiles and stone-effect tiles, install from left to right.
+ For large wave tiles, install from right to left.
– Fastening Tiles:
+ Each tile is securely fastened to the batten with screws.
+ For small wave tiles, use 40mm screws, with each tile requiring only 1 screw for fastening.
+ For large wave tiles and slate-style tiles, 60mm long screws are required; 2 screws can be used for the slate-style tiles.
STEP 3: INSTALLATION OF ACCESSORY TILES
– Verge Tile: Begin by installing the ridge end tile, then continue with the other verge tiles, ensuring the lower edge fits tightly over the outermost main tile.
– Under Ridge Tile: Use a cutter to trim the upper end if it overlaps the main tile row above.
– Ridge Tile: Install the first ridge end tile, using a 10cm long bolt to penetrate through the tile’s hole and drill into the central purlin.
Key notes:
– Start from the bottom up: The general principle when laying tiles is always to start from the bottom row and lay gradually upwards.
– Ensure alignment: Use a plumb line to ensure the tiles are aligned in a straight row.
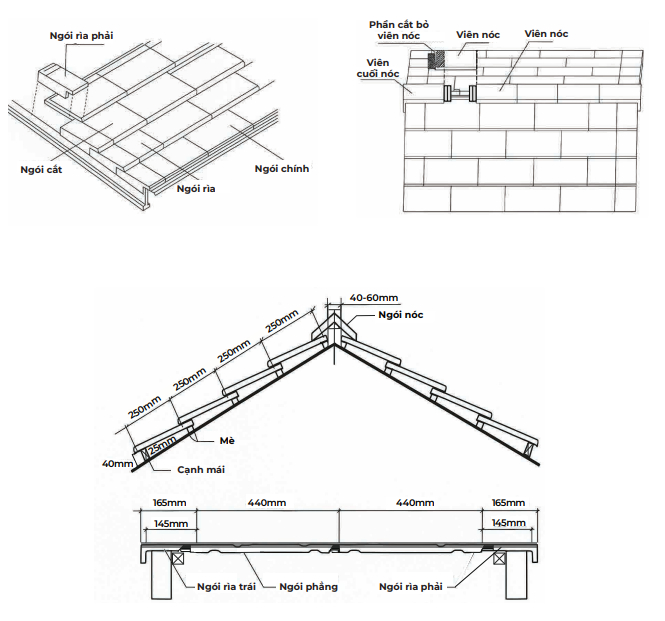
To install SHINKO flat tiles, prepare the roof structure with an optimal slope of 20 degrees or more and a batten spacing of 250mm. Lay the tiles following the principle “left to right, bottom to top”, starting with the right verge tiles, then install the main tiles in a staggered patter. Finally, install the ridge tiles. Each tile is fastened with steel screws to ensure the roof’s stability.
STEP 1: PRE-INSTALLATION PREPARATION
– Roof Slope Inspection: Ensure the roof has an optimal slope of 20 degrees or more for SHINKO flat tiles to perform effectively.
– Check the truss system: Ensure the truss system is securely installed and aligned in parallel.
– Check batten spacing: The spacing between battens must be uniform and within 250mm.
STEP 2: TILE INSTALLATION PROCESS
– Lay the bottom row:
+ Start by installing the right verge tile first.
+ After that, install the subsequent main tiles in a staggered pattern from right to left until reaching the left edge.
– Laying the subsequent rows:
+ Repeat the same procedure as the bottom row: Install the right verge tile, then use the half main tile cut from the row below (or cut a main tile in half if the row below was a full tile) to install next to the right verge tile.
+ Always ensure the main tiles are laid in a staggered pattern and are installed from the bottom up.
STEP 3: VERGE TILE AND RIDGE TILE INSTALLATION
– Verge Tile Installation: Press the verge tile firmly against the side decorative trim and use mortar to bond tightly with the main tiles, ensuring stability and durability for the roof.
– Ridge Tile Installation: Install the ridge tiles on top of the roof’s peak, connecting them together with flexible mortar at the base of the tile’s edge to form a unified block, which helps the roof to be not only visually appealing but also durable and effectively waterproof.
STEP 4: TILE FASTENING SCREW
– Main Roof Tile: Secure all main roof tiles with steel screws to ensure they are firmly connected to the roof batten (lito).
– Verge Tile and Ridge Tile: Use screws from 5cm – 7cm to secure the ridge tiles, while the verge tiles are secured with mortar.

 Tiếng Việt